We help people repair plastic
Hose & Wire Assembly Replacement in a 6053 Hot Air Welder
This video will demonstrate how to replace the hose and wire assembly in your 6053 E-Z Weld 2.0 Hot Air Welder.
Make sure your welder is cool and disconnected from the power before you begin the repair.
Always wear proper safety gear while working!
Let us know your thoughts on this video by leaving a comment on YouTube!
Click here: https://www.youtube.com/watch?v=laiiJqBXOeo
Replacement hose and wiring assembly for the following welders:
| Part Number | Welder Description |
|---|---|
| 6050HA | EZ Weld Hot Air Plastic Welder |
| 6051 | Dual Fuzer Nitrogen Welder |
| 6053 | E-Z Weld 2.0 Hot Air Welder |
| 6056 | Nitrogen Welding System |
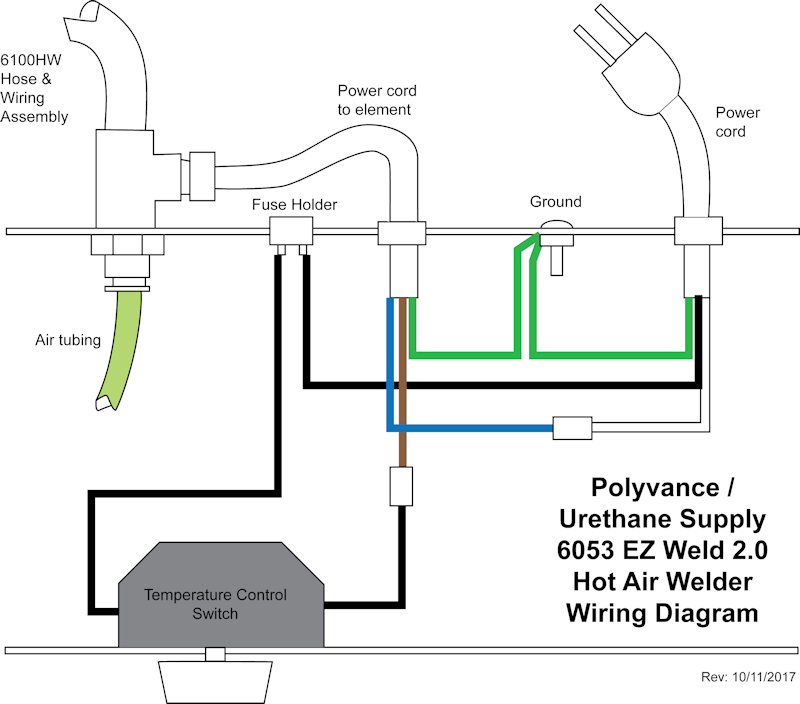
Wiring Diagram

Featured Product:
Video Notes:
- The 6053 Hot Air Welder is an outdated model. This video is to help those who already have a 6053 and need to replace the hose and wiring assembly. To see our current selection of nitrogen plastic welders, please click here.
- English Closed Captions have been provided for this video. Click on the CC button to turn them on or off.
- The length of this video is in no way representative of the actual time required to perform a complete repair and therefore should not be used for estimating purposes.
Music Credits:
- "Gearhead" Kevin MacLeod (incompetech.com)
Licensed under Creative Commons: By Attribution 3.0 License
http://creativecommons.org/licenses/by/3.0/ - "Delay Rock" Kevin MacLeod (incompetech.com)
Licensed under Creative Commons: By Attribution 3.0 License
http://creativecommons.org/licenses/by/3.0/
English Transcript:
This video will show you how to replace the hose and wiring assembly on the 6053 Hot Air Welder. To begin replacing the hose and wire assembly in your 6053 E-Z Weld 2.0 Hot Air Welder, you must first unscrew and remove the top panel of the welder. Then, remove the tubing from the fitting by pressing down on the fitting's collar while pulling on the tube. Remove the fitting's lock nut with two 11/16 inch wrenches.
Snip the power cord wires close to the outer sheath to keep the remaining wires long. Remove the strain relief from the old power cord. Remove the bulkhead fitting from the old hose. Install the fitting on the new hose & wiring assembly using 9/16ths and 11/16ths inch wrenches. Place the fitting back inside, securing the lock nut on the inside of the welder. Tighten with two 11/16 inch wrenches. Push the tubing back into the quick-disconnect fitting.
Take the power lead wires from the new hose and thread them back through the welder. Insert the power cord strain relief, leaving some slack in the cord outside the box. Cut off the excess wire, leaving about nine inches. Strip three inches of outer sheath from the power cord. Then, strip back the ends of the blue, brown, and green wires from the power cord. Remove the pack of terminals included with the assembly. Strip back the existing white, green, and black wires inside the welder to connect with the new power cord. Crimp three female spade terminals onto the white, green, and black wires from inside the welder. Crimp three male terminals on the blue, brown, and green wires from the power cord. Secure the blue wire to the white wire, the green wire to the green wire, and the brown wire to the black wire as shown in this wiring diagram. Place everything neatly back inside the welder. Screw the top panel back onto the welder.
Products Used

