We help people repair plastic
Search Results: Products (223)
reviews
2502
reviews
3725-4
Bumper and Cladding Color Coat is an advanced, l
$0
reviews
3727-4
Bumper and Cladding Color Coat is an advanced, l
$0
Search Results: Video (84)
Search Results: Pages (38)
Repairing Plastics with Two-Part Adhesives Clean both sides of the plastic in the damaged area with 1000 Super Prep or 1001-4 EcoClean plastic cleaner. Fixture the front side with clamps or aluminum tape to hold the part together while the adhesive on the backside cures. Sand the backside of the area to be repaired with 50 grit sand paper or coarser. A v-groove is n...
Repairing with FiberFlex Universal Rod FiberFlex Video FiberFlex is a unique repair material in that it sticks to any plastic substrate. It is not a true welding rod, but rather a thermoplastic or hot-melt adhesive. When you do a repair with the FiberFlex, you will actually be using the heat of the welder to apply an adhesive. FiberFlex has a very strong bond and is reinf...

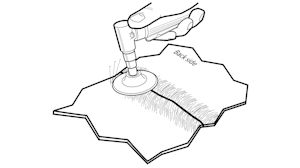
Step 4 - Apply Epoxy Filler Grind area to be filled with coarse sandpaper. Slightly v-groove away from the damaged area. All gloss on the surface should be removed to maximize filler adhesion. If the material is a polyolefin (PP, PE, TEO, or TPO), apply 1060FP Filler Prep Adhesion Promoter. Choose a two-part epoxy filler to match the hardness of the substrate. If flexible, use ...
![[Step 1]](../images_old/MethodFStep1a.jpg)
Repairing Plastics with PlastiFix The PlastiFix Rigid Plastic Repair Kit is a revolutionary plastic repair system that allows you to repair cracks, fill gaps, rebuild tabs, and fix stripped threads. The most unique feature of the PlastiFix Rigid Plastic Repair Kit is the FlexMold flexible molding bar. The FlexMold bar allows you to replace a broken tab by forming a mold from an undamaged...

PlastiFix - Repair Cracks and Fill Gaps Here is an example of a typical crack on a motorcycle fairing. Starting from the backside, grind away the paint surrounding the damage. This will give the PlastiFix a better surface to bond to. Cut a piece of fiberglass cloth (not included with the kit) that will span and overlap the crack. Place the cloth in place after...