We help people repair plastic
Aircraft Plastic Repair
Aircraft Plastic Repair
By: Scott E. Bixler
Article taken from EAA Sport Aviation Magazine, September 2003
If you've ever owned an aircraft with a cracked instrument panel or taken a piece out of a plastic tail cone with a tow bar, then you'll be happy to know these items can be repaired with relative ease and at a reasonable cost. Plastic components on aircraft are typically made of ABS or a fiber reinforced polyester matrix (i.e. fiberglass, carbon fiber, or Kevlar.) and are more easily repaired than one might think.
In this article I will discuss some alternate repair techniques that can be used on both ABS and non load bearing FRPMs. Because many structural components are made of plastic, you must first conclusively determine if the damage has compromised the integrity of the part and if it should be repaired. If there is any question as to the structural integrity of components, do not attempt a repair, have a qualified person perform a thorough examination and then make the call. With that said, my opinion is that virtually every nonstructural piece of plastic on your plane is worth fixing, especially if you've priced the replacement cost of OEM components. The replacement cost of the instrument panel for this article is about $500!
I'm sure most of you are familiar with repairs using two part epoxies in the construction and repair of fiber reinforced polyester matrices and feel comfortable using this type of adhesive. Unfortunately, it is not the best method of repair for ABS and is impossible on the polyethylenes (PE) and polypropylenes (PP) sometimes used in fuel tanks. Plastic welding is the only viable option PE and PP, but will not be discussed here. For ABS, which is commonly used for instrument panels, tail cones, inspection covers, strut fairings, etc, the certified repair method is welding. As anyone who has ever tried welding a thin piece of ABS plastic together will tell you, it is very difficult to do without distorting the part or having problems with alignment.
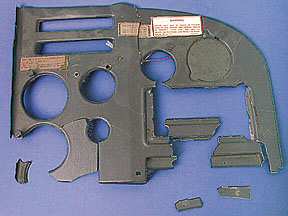
To test alternate methods of repair for thin ABS, Larry Hancock, a local EAA chapter member loaned me the instrument panel from his friend's Cessna 206. Unfortunately, it was in pretty bad shape and was in even worse shape after I got it caught in a self-closing door. As you can see in the photo, the damage was extensive. The door turned the panel into a jigsaw puzzle. Even though I have virtually limitless resources for plastic repair through Polyvance, I was having some serious doubts as to whether or not this thing was savable. In order to prevent some major embarrassment and not have to explain to my employer why we were buying this guy a new $500 panel, I felt obligated to give it a try
The instrument panel is made of 1/16 inch ABS and was extremely brittle from being cooked in Alabama sunshine for 20+ years. There were pieces missing, it was cracked everywhere and in my opinion was ready for the trash. Since I wanted to test some plastic repair techniques with Polyvance's products, I decided to proceed against my better judgment. Happily, the repair was much easier than I expected and the results were spectacular!
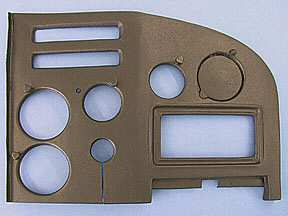
With about $100 worth of materials from the Polyvance, this instrument panel was repaired to like new condition. An average repair of this type would be far less extensive and take considerably less time than it took me. As it was, it took 12 to 13 hours to complete, so I figure I was saving about $40 per hour doing the repair. That's not too shabby! If you follow these directions, you will have a beautiful, durable and cost effective repair for your broken ABS parts.
The Process: Establish a Plan of Attack
Begin by rough assembling your part (or what's left of it in my case) to find out what order the pieces should go together. Start with the largest piece and work your way down in size until you run out of parts. Some exceptions to this rule may be where a smaller part fits in a notch between two larger pieces.
The next step is to determine which repair method is the best. For this, there are basically three options; welding, gluing, or using a product like PlastiFix.
Welding produces a strong and light repair, plus if the area needs reinforcement, you can melt some stainless steel mesh into the weld for extra strength. The disadvantage of this process is that it tends to warp thin parts and sometimes alignment can be an issue.
Glues like Polyvance's Insta-Weld, a cyanoacrylate adhesive, are good because they are lightweight, fast, strong and easy to use. Other adhesives like epoxy, produce an adequate bond and can be made thicker and reinforced with glass, but are heavier, messier, smelly, and are often difficult to sand.
PlastiFix, the third alternative, melts into ABS, producing a bond similar to solvent welding and produces a thermoplastic when cured. It can be used to fill large cracks, create missing pieces, and re-thread stripped bolt holes in plastic. It is also light-weight, strong, and can be reinforced with fiberglass for additional strength.
Bonding with Insta-Weld:
For this project, I used a combination of PlastiFix and Insta-Weld. I chose Insta-Weld to be the bonding agent that held the ABS pieces together while performing the actual repair with PlastiFix. Insta-Weld is easy to use and requires a minimal amount of materials to complete. For this part of the repair I used aluminum auto body tape, Thin Insta-Weld, Insta-Weld activator, and 80 grit sand paper.
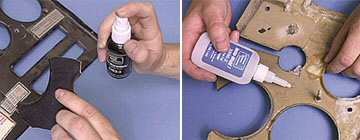
Begin by lightly scuff sanding the area to be bonded in order to clean the surface and promote adhesion by giving the glue a larger surface area to stick to. Spray the area to be glued with activator and let it flash off. It will remain active for 15 minutes. In this time, you will need to tightly join the cosmetic side of the item together with aluminum tape to properly align the surfaces. Then apply Insta-Weld to the length of the repair and let it wick in for a short time. Let it dry or spray with more activator to instantly cure the Insta-Weld and you're done! If you manage to glue yourself to your project or your workbench, Polyvance also makes stuff called Super Solvent for InstaWeld that will unstick you. This stuff is quite handy to have around although I didn't need any for this project.
Because of the small bonding area a butt joint in 1/16” ABS offers, I needed to reinforce the joint with additional material to make it more durable. Because PlastiFix has superior adhesion to ABS and I needed to create some missing pieces, I knew PlastiFix would be the best method of repair.
Using PlastiFix: Joint Reinforcement
One of the nicest things about the PlastiFix kit is how tidy it is to use. PlastiFix is mixed in place on the repair area and there are no mixing sticks or globs of adhesive to fall on the floor. PlastiFix also has an unimposing odor and was easy to place where it was needed without migrating to a place it wasn't. The supplies needed for this step are similar to Insta-Welds', with the addition of fiberglass cloth, a PlastiFix repair kit and three extra molding bars.
After securing the parts together with Insta-Weld, scuff sand the non-cosmetic side of the repair about 5/8” to either side of the joint with 80 grit sand paper. Using aluminum tape, make a mold for any edges of the crack that may have chipped off or any areas that may need to be dammed up so the PlastiFix will take on a shape closer to the original shape of the part.
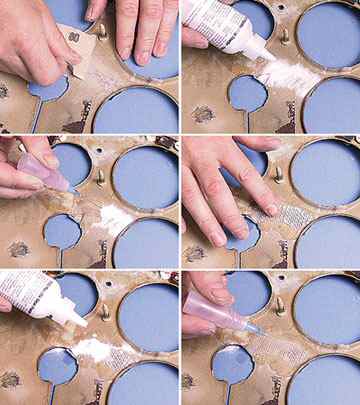
To fill small areas, or areas that are in a tight spot, you will want to use the ball drop application method. Begin by filling the dropper bottle to the top with PlastiFix liquid. Next, fill the small mixing cup half way with PlastiFix powder. Drip one drop of liquid into the powder and immediately impale it with the tip of the needle and remove it from the cup. Place the ball on the area you want the PlastiFix to be and squeeze out enough liquid to get the ball to flow off the end of the needle and into the area you want to fill. If the liquid drop hits the bottom of the plastic cup, then you didn't fill it far enough and it will be tough to get the ball out with the needle. You will need to fish the ball out of the cup with your fingers after it hardens. If the ball will not flow out on the part, then you are either not using enough liquid or you must work a little faster because the PlastiFix is beginning to set up before it hits the surface. Repeat as many times as you need or if you have a lot of area to cover, try the next method of applying PlastiFix.
Another method for applying PlastiFix is the sprinkle method. This is the method I used the most and is typically used for larger, flat areas and for reinforcing joints with fiberglass. After scuff sanding around the joint, sprinkle the powder up to 1/16” deep over the area to be reinforced. Once covered, rapidly drip liquid on the powder starting at one end, working your way down to the other, saturating it as you go. Repeat this process until you reach a depth where you feel secure with the strength of your repair. If your plans are to reinforce the joint with fiberglass, press the fiber glass into an uncured second layer PlastiFix. Apply a third layer of PlastiFix on top of the fiberglass to smooth the surface and reinforce the repair
Using PlastiFix: Reproducing Missing Parts
If you have an area of plastic that is missing from a piece you are working on, PlastiFix can be used to make a new one that is even stronger than the original. It always helps to have something to make a mold from to create an edge, or a missing tab, although with a little ingenuity and patience, you can build molds from scratch using aluminum tape!
First, you'll need to use the molding bar(s) from the repair kit. Simply heat the bars in near boiling water for 3 minutes and press the softened bar onto the part you need to make a mold of until the bar has cooled. You may run it under cold water to speed the cooling process up. Be careful to get the details of the original in the mold without curling the bar too far around the edges. This will make it difficult to remove from the original and you certainly don't want to break that! Multiple bars can be squashed together to make one big one if the part you need to produce is too big for just one bar. This was the case for the rectangular cut-out on the panel.
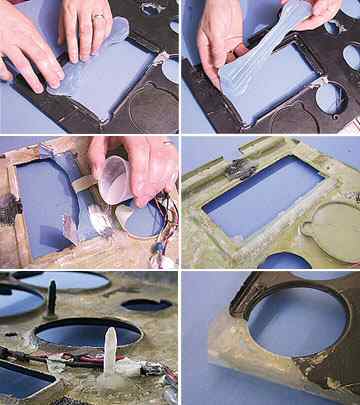
Once you get a suitable mold, tape it with Aluminum tape to the location where you want to make the part and fill the mold with PlastiFix using the sprinkle method. You can also add some fiberglass if you need too. After the PlastiFix has set up for at least 30 minutes, carefully peel off the mold…and Voila! A NEW part! Occasionally, there might be a void the PlastiFix didn't fill. If there is, you can fill it with PlastiFix and sand it to shape or wait until later and use body filler.
Making the mounting pins for the back of the instrument panel was done in a similar fashion. The only exception was that I used very small amounts of powder before dripping in some liquid. It was difficult to get the right ratio of powder to liquid and had some major voids in some of the pins. A few tries and a couple of bad pins later, I had success. Another problem I experienced making the pins was difficulty removing the pins from the mold. By heating the mold slightly to make it more flexible, the pins became easier to extract. If you heat it too far however, the part will become soft and deform, so be careful!
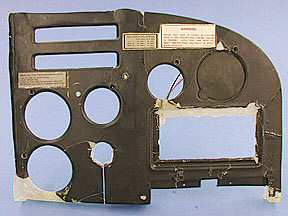
Fabricating missing parts can be tricky and my only recommendation is to start with what you know. The missing corner of the panel offered a series of challenges. I began by making a mold of the curve of one of the other instrument cutouts to complete the missing piece of the circle. Then I extended the raised lip coming from the top down to the edge of where I thought the end of the panel should be, by making a “mold” from aluminum body tape and molding bars. To get the tape straight, I used a putty knife and carefully shaped it the best I could before filling it. Once filled, be sure to let the PlastiFix fully cure before removing the tape, otherwise the tape adhesive will stick to the PlastiFix instead of the tape. Finally, the bottom edge was made the same way and the rest was filled where needed. After sanding and a little shaping with a file, you would never know the piece wasn't original.
Keep in mind that all of the repairs of the panel were done to the back side of the panel so there was less to fill on the front when it came time to finish. Also, if you notice some brittle, thin, or weak areas on parts like this, you can apply a layer of PlastiFix on the back side to help strengthen it.
Cosmetics: Where the Plan Comes Together
Finishing ABS parts is pretty straight-forward. Begin by sanding off any PlastiFix that went beyond the mold, any high spots, or any other abnormality that may impede mounting the piece when finished. This would be a good time to re-drill any mounting holes that were filled and to test fit the part on the aircraft.
Sand the entire cosmetic surface with coarse sandpaper to promote adhesion of the filler and make any low spots stand out. I circled the low spots with a permanent marker before finishing sanding so I would know where to fill later on. Use PlastiFix to fill any structural voids or areas that will experience wear, being careful not to overfill because PlastiFix isn't the easiest thing to sand down.
V-Groove all the joints you just repaired with a tear-drop shaped Dremel bit. Go about 1/3 of the way through the joint, then round the edges of the groove with coarse sand paper. This seems counterintuitive to the repair you just made, but it is necessary for the filler to get a good bond and to allow the filler to feather nicely with the surrounding areas. Fill all the hollows and V-grooves with 2020 Hard-set Filler (another product from Polyvance). This Filler is especially formulated to sand easily and bonds better than other popular brands of filler. When you mix it, use equal parts of A and B, and stir until it becomes a uniform grey. 2020 Hard-set Filler sets up quickly and is ready to sand in about 15 minutes. Sand down any high spots with 80 grit paper, fill any missed low spots, then sand again.
You should now be ready to apply a texture coating to simulate the original finish. If you wish to have a smooth finish, then you will have to sand down to 400 grit or finer to remove any scratch marks from the surface and spray with a primer-surfacer and re-sand with 400 grit paper.

For a texture similar to that of the original panel, you can use a product like Polyvance's Flex-Tex. Flex-Tex is a flexible texture material that can have differing amounts of texture based on the pressure and flow you set on the gun: the higher the pressure, the finer the texture. If you spray it at too high a pressure it will dry before hitting the object and will leave a hairy looking surface. Too low a pressure and the gun will spit out the texture material in small blobs. Other types of texturing materials are available in aerosol cans, but the appearance cannot be varied as easily.
When spraying Flex-Tex, be sure to use a 2.0 nozzle on your spray gun so it won't clog. Set the air pressure between 30 and 40 psi and adjust the flow until you get the desired texture. Spray the part and inspect it for any defects. Remove any fuzz or loose texture by lightly going over the surface with a 3M scuff pad. If you haven't already done so, cut away any parts that were bonded together for alignment before you spray the finish coat. I forgot to do this and had to spray the finish coat twice!
For the finished surface, I chose Polyvance's Bumper and Cladding Coat (available in assorted shades of gray) for several important reasons. First, it was formulated for use on demanding plastics like TPO, so it has no problem bonding to ABS. It also has a satiny OEM-ish sheen when dry, requires no thinning, is forgiving to spray and is dry in 15 minutes. If you are painting bare plastic with Bumper and Cladding Coat, you do not need to prime the surface with anything because Bumper and Cladding Coat has an adhesion promoter in the formula. In fact, it sticks better to bare plastic than most primers! Once painted, the only remaining thing to do is bond the mounting pins to the back of the panel and install it on the aircraft.
The finished instrument panel has been returned to its happy owner and has been installed on the aircraft. Larry was amazed with the outcome of the project and couldn't believe it was possible to get the results I did from what he had given to me. His jaw dropped when I told him about “the door.”Once installed on the plane, it is difficult to tell it wasn't new." I see the pilots side of the panel in my future…or maybe not. I think Larry can handle that!
If you would like any additional info on this process, or need to know specifics about the products used, feel free to contact me by clicking here and I will do my best to answer any questions you may have.
Products Used For This Repair

